These muffins taste just like eating pumpkin pie! I like the strong pumpkin flavor.
Pumpkin streusel muffins
1 cup self-rising flour
1/2 cup sugar
2 tsp cinnamon
1 tsp apple pie spice mix (or 1/2 tsp each cloves and nutmeg)
1/2 tsp ginger
3/4 cup canned pumpkin
1/2 cup plain Greek yogurt
1/4 cup milk
1/4 cup oil
1 tsp vanilla
Streusel topping:
1/4 cup flour
2 tbsp sugar
1 tsp cinnamon
1 1/2 tbsp butter
Preheat oven to 350.
Combine dry ingredients, then add in wet ingredients. Stir until mixed. Scoop mixture into greased muffin tin.
For streusel, mix together flour, sugar, and cinnamon. Cut the butter into small pieces with a knife or fork, then use your fingers to rub the mixture together until butter is evenly distributed and mixture looks like wet sand.
Sprinkle streusel over muffin batter in tins, and bake for 18-20 minutes, or until streusel is light brown and a toothpick inserted into a muffin comes out clean.
Sunday, November 30, 2014
Sunday, November 16, 2014
Pumpkin crumble bars

Tis the season for all things pumpkin spice, right? Although I guess I'm a little late, seeing as it's November already.
These bars were inspired by the fact that the only cans of pumpkin puree at the grocery store were those ginormous ones. 28 oz maybe? Definitely at least 4 cups of pumpkin. Anyway, I had opened the can for another recipe and wanted the use the rest of the pumpkin for something else. I brought these to a friend's house for a football gamewatch, and they got rave reviews. They're not too sweet -- you could easily eat them for breakfast. (In fact, I'm about to do just that!)
Pumpkin Crumble Bars
Crust:
3/4 cup butter
2 cups flour (could make gluten-free by substituting oat flour)
2 cups slow-cooking oats
1 cup brown sugar
1/2 cup white sugar
1 tsp cinnamon
1 tsp baking soda
1/2 tsp salt
2 tbsp vanilla
Filling:
6 oz. softened neufchâtel cheese
1 1/2 cups pumpkin puree (not pumpkin pie mix)
1/2 cup brown sugar
2 tsp vanilla
2 eggs
1 tsp cinnamon
1/2 tsp ground ginger
1/2 tsp apple pie spice mix (pumpkin pie spice mix would probably be better, but this is what I had!)
Preheat oven to 350 degrees. Line a 9 X 13 pan with parchment paper or tin foil.
Place the butter in a large, microwave-safe bowl and head it for about 45 seconds, until softened but not completely melted. Add all other crust ingredients. Mix the butter into the dry ingredients with a pastry cutter or your fingers until butter is evenly distributed and mixture looks like wet sand. Reserve one cup of the crust mixture and pour the remaining crust mixture into the prepared pan. Press down hard to make sure the crust sticks together. Back for 12 minutes (try not to over bake).
Meanwhile, blend filling ingredients together. (Make sure your neufchâtel cheese is softened so your filling doesn't get lumpy.) Remove crust from oven and pour filling mixture over it. Top with the remaining cup of crust mixture. There should be enough to cover the filling with a single layer of crust, without any gaps.
Bake for 25 minutes or until the top crust is light golden brown. Allow to cool to room temperature before eating.
Adapted from Joy the Baker, Ambitious Kitchen, and Kraft recipes.
Slow cooker barbecue chicken
I've made this recipe twice now, once just for LC and me, and once for company -- when a priest came over for dinner and to bless our house. :) It's deliciously sweet and just a little spicy. The leftovers are great too!
The steps are pretty simple. Just dump everything in a crock pot! My only advice for prep is to measure all of the spices (salt, garlic powder, red pepper flakes, paprika, chili powder, and cinnamon) into a large liquid measuring cup, like so:

Then pour in a bottle of beer, and 2 tbsp honey and stir with the spices. That way you can make sure the spices are evenly distributed around the chicken.

The steps are pretty simple. Just dump everything in a crock pot! My only advice for prep is to measure all of the spices (salt, garlic powder, red pepper flakes, paprika, chili powder, and cinnamon) into a large liquid measuring cup, like so:
Then pour in a bottle of beer, and 2 tbsp honey and stir with the spices. That way you can make sure the spices are evenly distributed around the chicken.
Serve with some hamburger buns and some type of creamy salad (caesar, cole slaw...). You'll definitely want something to cut the rich tangy sweetness of the chicken!
Crockpot Barbecue Beer Chicken
2 pounds chicken breasts (could use thighs)
2 pounds chicken breasts (could use thighs)
2 tbsp honey
1 tbsp paprika
2 tsp garlic powder
1 tsp chili powder
1/2 tsp cinnamon
1/2 tsp red pepper flakes
1 bottle of beer (around 1 1/2 cups)
3 cups of bbq sauce (OR one 28-oz bottle of bbq sauce, for example, Sweet Baby Ray's)
Place chicken in crock pot. Mix honey, paprika, garlic powder, chili powder, cinnamon, red pepper flakes, and beer together, then pour over chicken. Add the bbq sauce.
Cook for 5-6 hours on low or 3-4 hours on high.
Place chicken in crock pot. Mix honey, paprika, garlic powder, chili powder, cinnamon, red pepper flakes, and beer together, then pour over chicken. Add the bbq sauce.
Cook for 5-6 hours on low or 3-4 hours on high.
Before serving, remove chicken from crock pot and shred it with two forks. Return the chicken to the sauce in the crock pot, and stir.
Adapted from Halfbaked Harvest. (My biggest change was upping the amount of garlic powder, and lowering the amount of chili powder, and I'm very glad I did -- there's a definite kick to this version of the bbq sauce, and I think more chili powder would've made it too spicy for me and LC.
Adapted from Halfbaked Harvest. (My biggest change was upping the amount of garlic powder, and lowering the amount of chili powder, and I'm very glad I did -- there's a definite kick to this version of the bbq sauce, and I think more chili powder would've made it too spicy for me and LC.
Tuesday, July 29, 2014
Orange Cranberry Zucchini Muffins

They say necessity is the mother of invention, right? Well, these muffins were invented when I realized that we were out of chocolate chips. And applesauce...two of the ingredients in Chocolate Covered Katie's chocolate chip zucchini muffins. By the time I was done adapting this recipe to food we actually had in the house, I had added three different types of fruit to replace the chocolate, making these muffins even more legit breakfast food. Of course, then I topped them with an orange-flavored glaze, so I guess these can count for dessert too.
By the way, when I said "the house" in the above paragraph, I meant my parents' house. It's time for the MN part of the MN-NJ cooks blog, as I'm back in Minnesota for four more weeks...until my wedding!! LC, however, is still in NJ, and holding down the cooking for the East Coast part of this blog. Check out the message on his omelette! :)

Awww!
Alright, onto the recipe! Flour, sugar, oil, one banana, one zucchini (maybe not quite as big as this one!), baking powder, vanilla, cinnamon, and salt. Not pictured: apple cider vinegar, cranberries, and orange zest. Hey, these things happen when you're adapting a recipe on the fly.
Alright, onto the recipe! Flour, sugar, oil, one banana, one zucchini (maybe not quite as big as this one!), baking powder, vanilla, cinnamon, and salt. Not pictured: apple cider vinegar, cranberries, and orange zest. Hey, these things happen when you're adapting a recipe on the fly.

Grate zucchini, mash a banana, add some oil, mix it all together together, and trust that it will taste better than it looks right now.

Mix the dry ingredients together, fold in the cranberries and orange zest, then immediately scoop into muffin tins.

I dunked these ones in the glaze and sprinkled some chopped cranberries on top. You can also drizzle the glaze over the top. Perfect for brunch! Enjoy.

Cranberry Orange Zucchini Muffins
Makes 24
3 cups flour
3 cups flour
3/4 cups sugar
1 1/2 tsp salt
1 tsp baking soda
1 tsp cinnamon
2 cups grated zucchini
1 mashed banana
2/3 cup vegetable oil
2 tsp apple cider vinegar
1 tbsp vanilla extract
1 tsp orange zest
1 cup dried cranberries.
Glaze: 1 cup powdered sugar
2 tbsp orange juice
Preheat oven to 375. Grease or line muffin tins.
Mix together dry ingredients (flour, sugar, salt, baking soda, and cinnamon), then in a separate bowl stir together zucchini, banana, vegetable oil, apple cider vinegar, and vanilla extract. Mix the wet ingredients into the dry ingredients, stirring well, and then fold in the cranberries and orange zest. Immediately portion into muffin tins (because these muffins are vegan and don't contain any eggs, the reaction between the vinegar and baking soda is what makes them rise, so if you wait too long to bake them, the reaction will have faded away).
Bake for 25-30 minutes, or until light golden brown.
Measure 1 cup powdered sugar into a bowl. Add orange juice - try starting with just 1 1/2 tablespoons, stirring well, and then adding more liquid if needed. This method helps you avoid watery glaze!
Top the muffins with the glaze and garnish with chopped dried cranberries, if desired.
Wednesday, July 9, 2014
Famous chili
This is one of our favorite recipes for game days. It's easy to make, stays warm for a long time, and is great for a crowd. LC came up with some creative serving ideas too! For a World Cup party, he filled some Scoops tortilla chips with the chili! Usually we just serve it with Fritos. However you make it, I can promise that it will disappear fast! I don't think anybody would come over to my house for the Super Bowl if I didn't make my famous chili. :)
Super Bowl Chili
1 lb ground beef or beef subsitute
1 can black beans (not drained)
1 can white beans (not drained)
1 can pinto beans (not drained)
2 cans (or 1 big jumbo can) of diced tomatoes (not drained)
2 cans corn (drained)
1 packet ranch dressing mix
1 packet taco seasoning mix (the spiciness of the taco mix has a big impact on the final flavor)
Brown the beef if necessary. Vegetarian beef substitute works great for this recipe, because you don't have to cook it at all (just heat it up with the other ingredients) and the other flavors are strong enough that you don't notice the lack of beef.
Anyway, combine the ground beef with all the other ingredients. Stir and heat -- can be done in a slow cooker if you like. Serve with Fritos.
I usually double this recipe for a crowd of 8-10. Once I messed up and bought 3 taco seasoning packets and only 1 ranch packet for a doubled recipe. I got a lot of people telling me that they loved it that way, but I personally found it too spicy.
The new kitchen!
Thursday, June 26, 2014
Chłodnik (Cold Polish beet soup)

Summer is definitely here! I love eating all the fresh fruit and veggies that are finally in season. I have to admit I was a little skeptical when I saw this recipe, but I like gazpacho and figured that this would probably be pretty similar. It doesn't tasted anything like gazpacho, but does sort of serve the same purpose - savory, creamy, vegetable-y, and most importantly, cold!
By the way, this soup is very filling, but the entire recipe is under 400 calories, at least according to my calculations. Winner!
No process photos this time, just the recipe.
By the way, this soup is very filling, but the entire recipe is under 400 calories, at least according to my calculations. Winner!
No process photos this time, just the recipe.
 Chlodnik (Cold Polish beet soup)
Adopted from Seraphic Singles
Makes three-four servings
4 cooked beets
Makes three-four servings
4 cooked beets
1 cube beef bullion dissolved in one cup water (or one cup veggie broth)
Juice of half a lemon
Juice of half a lemon
Half a cucumber, finely chopped
2 radishes (three if you like the taste of radishes), finely chopped
1 ounce fresh dill (one package)
1 ounce fresh dill (one package)
1 Tbsp chopped chives
1 cup plain Greek yogurt
1 cup plain Greek yogurt
Salt to taste
Shred the cooked beets into a bowl using a cheese grater. Add the broth and lemon juice and stir.
Combine the cucumber, radish, dill, and chives in a separate bowl, mixing well, and then add to the beet mixture. Stir in the Greek yogurt. Cover the mixing bowl with a lid or with plastic wrap, and chill for 4-5 hours to let the flavors mix. Ladle the soup into a blender or Magic Bullet and blend for 30 seconds, or until smooth. (If you like, you can eat the soup without blending it, but I found the texture of the shredded beets to be kind of weird.) Garnish with chives and serve cold. (I sprinkled some feta cheese on top as well for the picture, but found that it actually didn't taste very good with the soup!) I've eaten this for lunch twice this week, once with a toasted English muffin on the side and once with chips. Some carbs are definitely a good match! :)
Tuesday, June 24, 2014
Ariquipe-filled Banana World Cup-cakes
One of L's favorite podcasts is called Men in Blazers, which discusses soccer, particularly the World Cup. They had a series of shows previewing the World Cup before it started, and at the end of each show the two hosts ate some World Cup-cakes and pretended that the cupcakes revealed the final score of the matches.
Well, my cupcakes definitely don't have any magical predictive powers, but I think they count as World Cup-cakes because we ate them during the US-Portugal match on Sunday. Also because I attempted to decorate them like soccer balls, but my chocolate ganache pretty much just failed. So...just stick with the banana cupcake recipe and frost them however you like. :)
The ingredients:


Then in a separate bowl, cream together the butter and sugar. I don't have a mixer, so I softened the butter for about 45 seconds in the microwave, to the point that it was extremely soft but not quite melted. Then I used this fork-like spatula to try to get as much air in the butter as possible. I think it worked pretty well!


And then the rest of the wet ingredients. I was lazy and didn't mash the banana separately first, but it probably would've been better to do so. Combine the wet ingredients with the dry.


Makes approximately 18 cupcakes
3 eggs
To fill cupcakes, cut out a small cone shape out of the top of each cupcake. Fill the hole with about 1 teaspoon of arequipe. Replace the top of the cupcake with the top part only of the cut-out cone. (Discard the rest of the cone). Frost with cream cheese frosting.
Well, my cupcakes definitely don't have any magical predictive powers, but I think they count as World Cup-cakes because we ate them during the US-Portugal match on Sunday. Also because I attempted to decorate them like soccer balls, but my chocolate ganache pretty much just failed. So...just stick with the banana cupcake recipe and frost them however you like. :)
The ingredients:
Flour, sugar, salt, cinnamon, butter, eggs, vanilla, baking powder, and bananas. Plus milk (not pictured). Sift the dry ingredients together:
Add in the eggs, one at a time:
And then the rest of the wet ingredients. I was lazy and didn't mash the banana separately first, but it probably would've been better to do so. Combine the wet ingredients with the dry.
And portion into muffin tins! These were pretty full, but I liked how they rose nice and tall after baking.
Once they're out of the oven, it's time to fill them! Make sure the cupcakes are cool.
Arequipe is a Colombian sweet that's pretty similar to dulce de leche or caramel. This tiny little jar is designed for schoolkids to bring in their lunchboxes to school! They even come with a tiny little spoon. So cute!
With a knife, carefully cut a circle in the top of the muffin, angling in as you cut so that you make sort of a cone shape. (You can really see how small the arequipe container is here!) Remove the cone from the muffin.
Spoon about a teaspoon of arequipe into the hole, until it's just below the top of the muffin. Cut off most of the cone from the top, leaving just a fairly flat circle of muffin "crust."
Then, put the top back onto the muffin. Once you frost it, nobody will even notice that little mark! The arequipe helps the lid stay in place, but you do have to be a little careful when frosting it not to budge the cut-out part too much.
I just used cream cheese frosting from a can for the top (again, I don't own a mixer at the moment, so I can't really make frosting). Then I tried to make a chocolate ganache for decoration, but it was super lumpy and runny and challenging to my not-so-good decorating techniques. So...just decorate them however you'd like.
Enjoy, and go USA! #Ibelievethatwewillwin
Arequipe-filled Banana World Cup-Cakes
Adopted from The Betty Crocker Big Book of Cupcakes Makes approximately 18 cupcakes
2 1/2 cups flour
2 1/2 tsp baking powder
1/2 tsp salt
1 tsp cinnamon
3/4 cup butter, softened
1 cup + 2 tbsp sugar (original recipe called for 1 1/4 cups, but I bumped it down a little because my bananas were so sweet and ripe)
3 mashed bananas
1 tsp vanilla
1/4 cup milk
Topping: 1/2 cup arequipe, cream cheese frosting.
Preheat oven to 350 degrees. Sift together flour, baking powder, salt, and cinnamon, and set aside. Cream together butter and sugar until soft and fluffy. Add in eggs, one at a time, beating after each addition. Fold in bananas, vanilla, and milk. Combine with dry ingredients and stir well. Divide into greased cupcake tins. Bake for 22 - 27 minutes (mine took exactly 25).
To fill cupcakes, cut out a small cone shape out of the top of each cupcake. Fill the hole with about 1 teaspoon of arequipe. Replace the top of the cupcake with the top part only of the cut-out cone. (Discard the rest of the cone). Frost with cream cheese frosting.
Monday, June 2, 2014
Tuesday, May 27, 2014
Banana-oatmeal breakfast cookies

Start with bananas.

Mash 'em. Just in case you didn't know what mashed bananas looked like:

Add the oatmeal, peanut butter, vanilla extract, salt, sugar, chocolate chips, and walnuts.

I tried an experiment of baking these in muffin tins. It kept the cookies nice and round but created a weird edge to them so...not really worth it?

Banana-oatmeal Breakfast Cookies
Adopted from Chocolate Covered Katie
1 ripe banana
1 cup quick-cooking plain oatmeal, divided (gluten-free if desired)
1/4 cup peanut butter
1/2 tsp vanilla extract
1/4 tsp salt
1 tbsp sugar
dash cinnamon
1/4 cup walnuts
1/4 cup chocolate chips
Preheat oven to 350 degrees.
Mash the banana in a large bowl. Place 1/2 cup of oatmeal in a magic bullet or other blender/food processor and blend for approximately 30 seconds, or until the oatmeal looks like coarse flour. Add the oatmeal flour and the rest of the oatmeal, along with the peanut butter, vanilla extract, salt, sugar, and cinnamon. Stir to combine and then fold in the walnuts and the chocolate chips.
Bake for 15 minutes or until cookies are light golden brown.
Sunday, May 25, 2014
Homemade hot pockets!
The fiancé, also known as LC, was born and raised in a South American country where savory foods for breakfast was the norm. He's adapted to granola bars and cereal here in the US, but I know he'd prefer a ham and cheese sandwich for breakfast most any day. Since we were preparing for a loooong road trip from NJ to MN (just like the name of the blog! what a coincidence), I figured some homemade ham and cheese hot pockets would be the perfect on-the-go breakfast.
I've made these "hot pockets" for him several times this year, with lots of different fillings: sausage, spinach, mushrooms, bacon...this really isn't a recipe so much as a technique. Be creative and enjoy! :)
Each hot pocket uses a lump of dough just a little smaller than a tennis ball. I usually just stretch and pull them by hand rather than rolling them out...this isn't a beauty contest.

Pile on the toppings: shredded cheddar cheese and deli ham, cut into bite-sized pieces.

Fold and tuck until all the toppings are encased by dough.

The tray ready to go into the oven! I cut some vents into the top of each hot pocket. When I've made a couple of different types of fillings in the same batch, I cut different types of vents for each type of filling -- X for vegetarian, horizontal vents for bacon, vertical vents for sausage, something like that. Or the filling can just be a surprise!

Of course, I failed to get a picture of the finished product -- next time!
Homemade hot pockets
Bread dough (1/4 of my favorite bread dough recipe made 5 hot pockets)
Fillings (cheese, spinach, mushrooms, bacon, chicken, sausage, ham...the sky is the limit! All meat fillings should be fully cooked, and all fillings should be cut/shredded into small pieces).
Pinch off a ball of dough, a little smaller than a tennis ball. Stretch and shape it into a rectangle. Place fillings on one half of the rectangle., and then fold the other half of the dough over the top. Pinch the ends together to create a tight seam.
Repeat until dough is all used up.
Cut slits in the top of each hot pocket for a vent.
Allow hot pockets to rest for about 30 minutes. Preheat oven to 425 degrees. Bake at 425 for 25 minutes, or until golden brown on top.
Friday, May 23, 2014
Frozen spinach smoothies
I know I'm not the first to jump on the "green smoothie" train, by a long shot. I love 'em. But I have to admit that often I end up not making enough in a week and throwing away the slimy spinach from the bottom of the bag.
The solution? Use frozen spinach!
The first time I made this smoothie, I defrosted the spinach in the microwave right before I made the smoothie. It definitely smelled very spinach-y, but I threw it in the blender anyway, and my first sip of smoothie was...pretty disgusting. The spinach was still a little warm, and gave the smoothie a really strong spinach taste. Luckily there was a quick fix: I added in a couple of ice cubes and blended it again. Then it was back to tasting like my yummy banana/vanilla green smoothie again! The texture, however, never got to be quite as smooth as when I made it with fresh spinach. So, I would say you should only try this recipe if you already have tried and like green smoothies. And make sure to keep the spinach cold!
Zee ingrediënten:
(blogger apparently thought I was changing to German, and spell-checked my "ingredients" as "ingrediënten" so I just went with it)


Frozen Spinach Smoothie
Add the following ingredients, in order, to a magic bullet or other individual-sized blender cup:
1 ripe banana, broken into chunks
2-3 oz. frozen spinach (1/4 of a box), defrosted
1/3 cup plain yogurt
1 tbsp honey
almond milk
The purpose of adding the ingredients in this order is to ensure best blending -- the bananas are the heaviest ingredient and will push everything down toward the blades. If you're making this in a "normal" blender, start with the yogurt, then the honey and the spinach, then the bananas, and finally the milk.
Blend until smooth. Makes one smoothie.
The solution? Use frozen spinach!
The first time I made this smoothie, I defrosted the spinach in the microwave right before I made the smoothie. It definitely smelled very spinach-y, but I threw it in the blender anyway, and my first sip of smoothie was...pretty disgusting. The spinach was still a little warm, and gave the smoothie a really strong spinach taste. Luckily there was a quick fix: I added in a couple of ice cubes and blended it again. Then it was back to tasting like my yummy banana/vanilla green smoothie again! The texture, however, never got to be quite as smooth as when I made it with fresh spinach. So, I would say you should only try this recipe if you already have tried and like green smoothies. And make sure to keep the spinach cold!
Zee ingrediënten:
(blogger apparently thought I was changing to German, and spell-checked my "ingredients" as "ingrediënten" so I just went with it)
Almond milk, plain greek yogurt, frozen spinach, one banana, and honey. Give it a whirl in a blender and you end up with this:
Frozen Spinach Smoothie
Add the following ingredients, in order, to a magic bullet or other individual-sized blender cup:
1 ripe banana, broken into chunks
2-3 oz. frozen spinach (1/4 of a box), defrosted
1/3 cup plain yogurt
1 tbsp honey
almond milk
The purpose of adding the ingredients in this order is to ensure best blending -- the bananas are the heaviest ingredient and will push everything down toward the blades. If you're making this in a "normal" blender, start with the yogurt, then the honey and the spinach, then the bananas, and finally the milk.
Blend until smooth. Makes one smoothie.
Wednesday, May 21, 2014
Roasted brussels sprouts
Turns out I like brussels sprouts! I have distinct memories of trying them once as a kid and claiming to hate them -- although I may have been influenced by their bad reputation. Aren't all kids supposed to hate brussels sprouts? Turns out they're actually pretty yummy when roasted with a little bit of olive oil and...maple syrup. Yup, maple syrup! I was skeptical too, but the little bit of sweetness caramelizes while the sprouts roast and makes this a totally crave-able dish.
I've made these both with frozen brussels sprouts and fresh. The fresh ones definitely have a better texture, but the frozen ones weren't bad. You can also use either real maple syrup or the fake stuff - I know I probably should be able to taste the difference, but...I can't.
Start with some olive oil and maple syrup. Tip: measure 1/3 cup of olive oil first and then pour the maple syrup into the same measuring cup up to the 2/3 mark. This way you don't get any of your measuring cups sticky!

Pour the mix over brussels sprouts cut in half and spread out over a foil-lined pan. Toss and sprinkle with salt and pepper. And lemon pepper, because lemon pepper makes everything better.

A quick trip in the oven and voila - a yummy side dish!!

Roasted Brussels Sprouts
Adapted from Trader Joe's
1 pound brussels sprouts
1/3 cup olive oil
1/3 cup maple syrup
salt, pepper, and lemon pepper to taste
Preheat oven to 400 degrees.
Defrost brussels sprouts if frozen; wash and remove from the stalk if using fresh. Remove any icky-looking outer leaves and cut sprouts in half. Place on a baking pan lined with foil.
Whisk olive oil and maple syrup together and pour over sprouts. Toss to coat. Sprinkle with salt, pepper, and lemon pepper to taste.
Bake for about 25-30 minutes, or until fork-tender and caramelized and delicious.
I've made these both with frozen brussels sprouts and fresh. The fresh ones definitely have a better texture, but the frozen ones weren't bad. You can also use either real maple syrup or the fake stuff - I know I probably should be able to taste the difference, but...I can't.
Start with some olive oil and maple syrup. Tip: measure 1/3 cup of olive oil first and then pour the maple syrup into the same measuring cup up to the 2/3 mark. This way you don't get any of your measuring cups sticky!
Pour the mix over brussels sprouts cut in half and spread out over a foil-lined pan. Toss and sprinkle with salt and pepper. And lemon pepper, because lemon pepper makes everything better.
A quick trip in the oven and voila - a yummy side dish!!
Roasted Brussels Sprouts
Adapted from Trader Joe's
1 pound brussels sprouts
1/3 cup olive oil
1/3 cup maple syrup
salt, pepper, and lemon pepper to taste
Preheat oven to 400 degrees.
Defrost brussels sprouts if frozen; wash and remove from the stalk if using fresh. Remove any icky-looking outer leaves and cut sprouts in half. Place on a baking pan lined with foil.
Whisk olive oil and maple syrup together and pour over sprouts. Toss to coat. Sprinkle with salt, pepper, and lemon pepper to taste.
Bake for about 25-30 minutes, or until fork-tender and caramelized and delicious.
Tuesday, May 13, 2014
Pesto Bread Braid
The next part of this bread dough I turned into pesto bread! This is an impressive-looking recipe that's actually not all that hard to make.
Start with bread dough - about 1/3 of the "basic bread dough" recipe. (If you're keeping track, I've now used 1/2 plus 1/3 of the dough...so yes, there is one sandwich-baggy-full of bread dough still in my fridge!)
Roll it out just like you would for cinnamon rolls. Spread with pesto sauce -- I used the jarred stuff but maybe someday I'll be brave enough to make it on my own! Go pretty light on the pesto...once you start to roll it up it will feel like the pesto has suddenly tripled in volume and is getting everywhere.
Sprinkle with cheese. Cheese makes everything better. I once was at a gym class and the teacher was talking about nutrition, and how she only eats things that contribute to her health. She said that cheese really wasn't good for anything...but I strongly disagree. :)


You will have two, slightly-messy, slightly-falling-apart strands. Place one on top of the other in a slight X shape, so they cross right at the middle. Then lift the bottom strand over the top one, and keep going until you reach the end. Start at the middle again and lift the bottom strand over the top one, etc. (By the way, starting in the middle helps keep the loaf somewhat evenly shaped. The middle usually still usually winds up fatter than the ends, but at least its symmetrical.)

Gently place your twisted dough rope into a greased baking dish (a cookie sheet works here too). Shape the dough into a loaf by curving it into an "S" shape.

Sprinkle a little more cheese on top, pop it into the oven, and this deliciousness is yours in less than 30 minutes!


Seriously, so delicious. A little bit of the olive oil from the pesto leaks out during the baking and gives the crust a wonderful texture. Plus the pesto and the cheese and the bread...YUM.
Pesto Braid Bread
Adapted from Confessions of a Foodie Bride
Bread dough
1/3 cup pesto
2 tbsp parmesan cheese + more for the top of loaf.
Roll out the dough to a rectangle, approximately 14" by 10". Spread with pesto and sprinkle with 2 tbsp parmesan cheese. Roll up the dough to form one long long. Using a serrated knife, cut the roll in half lengthwise. Cross the two strands in the middle and then twist them around each other, lifting each strand over and around the other and trying to keep the pesto part mostly facing up. Place on a greased baking sheet and shape into an S.
Allow to rest for 30 minutes. Preheat oven to 425.
Sprinkle with a little more parmesan cheese and bake for 25 minutes, or until light golden brown.
Start with bread dough - about 1/3 of the "basic bread dough" recipe. (If you're keeping track, I've now used 1/2 plus 1/3 of the dough...so yes, there is one sandwich-baggy-full of bread dough still in my fridge!)
Roll it out just like you would for cinnamon rolls. Spread with pesto sauce -- I used the jarred stuff but maybe someday I'll be brave enough to make it on my own! Go pretty light on the pesto...once you start to roll it up it will feel like the pesto has suddenly tripled in volume and is getting everywhere.
Sprinkle with cheese. Cheese makes everything better. I once was at a gym class and the teacher was talking about nutrition, and how she only eats things that contribute to her health. She said that cheese really wasn't good for anything...but I strongly disagree. :)
Roll it up, again just like a cinnamon roll. Here comes the scary part -- slice it down the middle!
You will have two, slightly-messy, slightly-falling-apart strands. Place one on top of the other in a slight X shape, so they cross right at the middle. Then lift the bottom strand over the top one, and keep going until you reach the end. Start at the middle again and lift the bottom strand over the top one, etc. (By the way, starting in the middle helps keep the loaf somewhat evenly shaped. The middle usually still usually winds up fatter than the ends, but at least its symmetrical.)
Gently place your twisted dough rope into a greased baking dish (a cookie sheet works here too). Shape the dough into a loaf by curving it into an "S" shape.
Sprinkle a little more cheese on top, pop it into the oven, and this deliciousness is yours in less than 30 minutes!
Here's what it looks like on the inside:
Seriously, so delicious. A little bit of the olive oil from the pesto leaks out during the baking and gives the crust a wonderful texture. Plus the pesto and the cheese and the bread...YUM.
Pesto Braid Bread
Adapted from Confessions of a Foodie Bride
Bread dough
1/3 cup pesto
2 tbsp parmesan cheese + more for the top of loaf.
Roll out the dough to a rectangle, approximately 14" by 10". Spread with pesto and sprinkle with 2 tbsp parmesan cheese. Roll up the dough to form one long long. Using a serrated knife, cut the roll in half lengthwise. Cross the two strands in the middle and then twist them around each other, lifting each strand over and around the other and trying to keep the pesto part mostly facing up. Place on a greased baking sheet and shape into an S.
Allow to rest for 30 minutes. Preheat oven to 425.
Sprinkle with a little more parmesan cheese and bake for 25 minutes, or until light golden brown.
Sunday, May 11, 2014
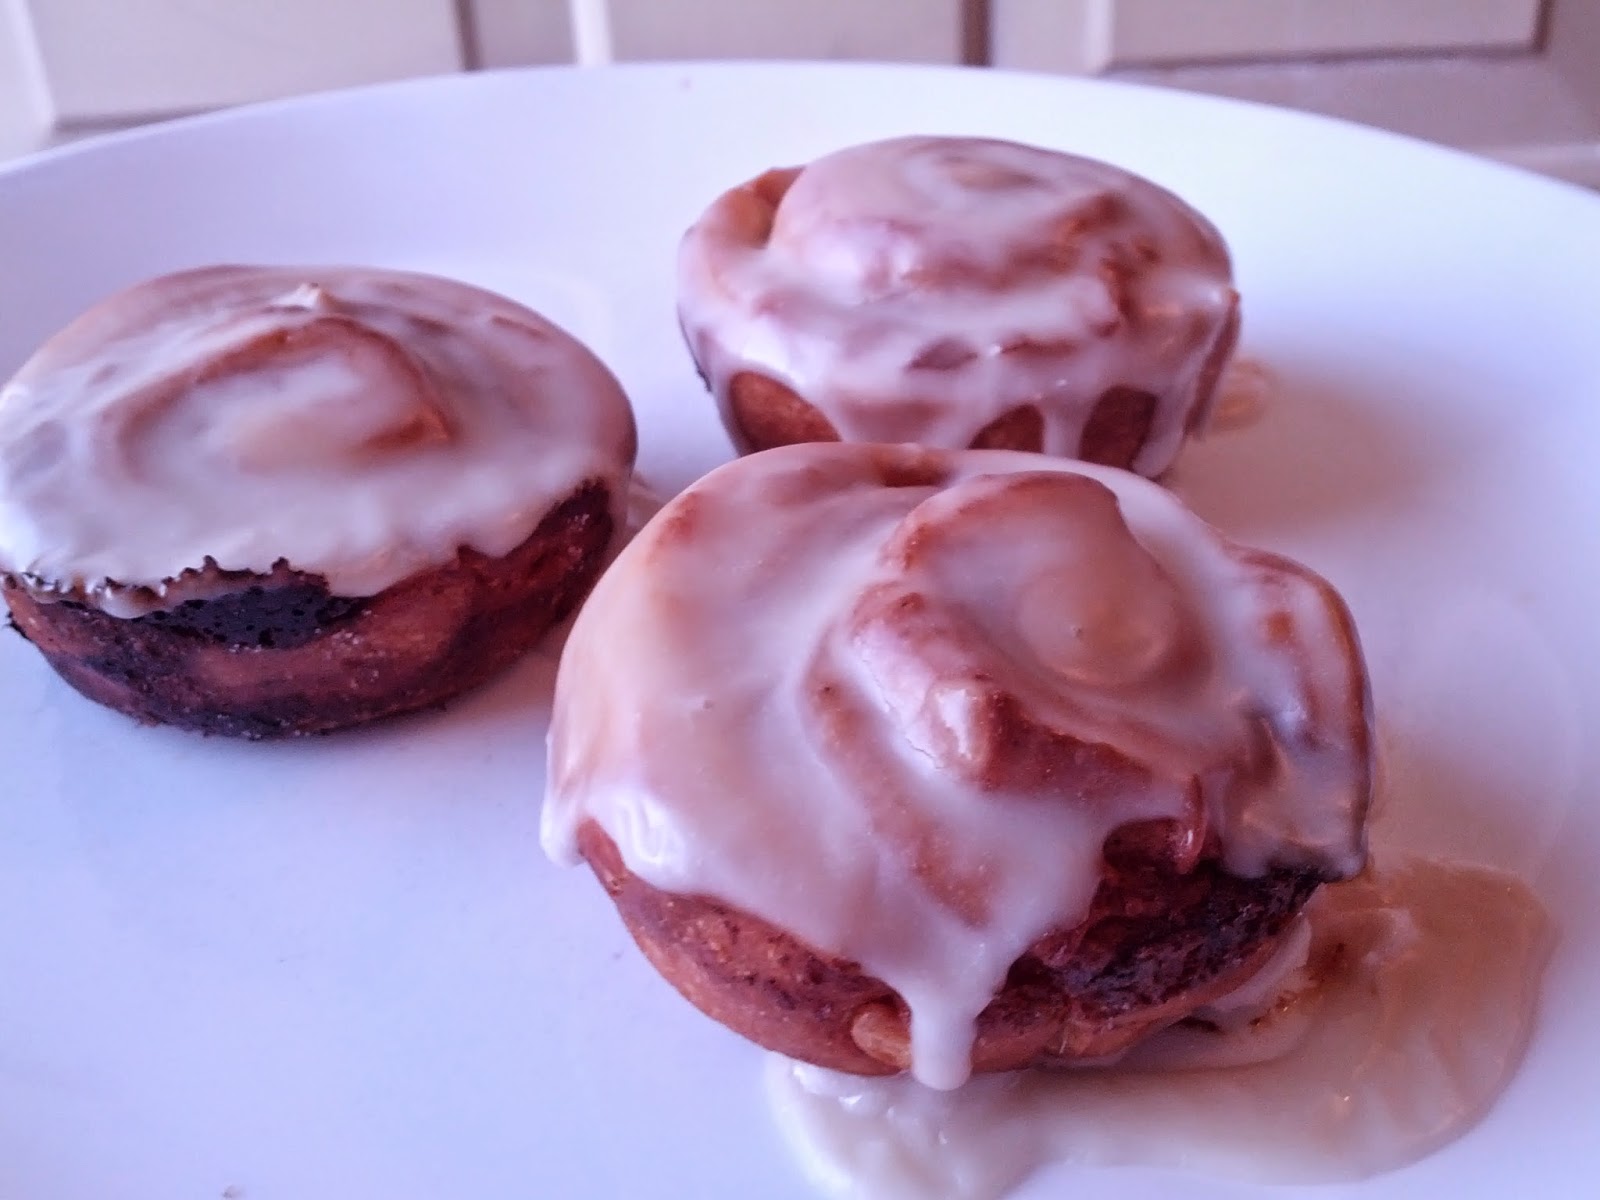
Cinnamon rolls
Last Sunday we had our Young Adults meeting at church. We meet after the 11 am Mass, so everyone's usually pretty hungry! I figured I'd make cinnamon rolls as a special Easter treat using my basic bread dough.
After punching down the dough, roll it out into a large rectangle. A squarer rectangle will create fatter rolls, but less of them, where as a very wide but short rectangle will make more rolls but they'll be a little thinner. In this case, I figured it'd be better to make smaller rolls so that everyone could have one, so I tried to make my dough as wide as possible. The dough should be pretty thin, about 1/4 of an inch.
Top with melted butter, cinnamon, and brown sugar, then roll it up! It will be messy, especially if the plumber stops by right during this step and needs to get access to the kitchen sink, which is about 6 inches away from where you're rolling out the dough. Be grateful you at least got a picture first.

I think cinnamon rolls taste best when they're all squished together as they bake. But putting alll the rolls in there would've been a little bit too squishy, so I also experimented with baking individual rolls in a muffin pan. The verdict? Squishy is indeed better. (Although I probably overbaked the ones in the muffin tin.)

Frost with a nice thick glaze of powdered sugar and milk, with some extra special flavorings recommended by the Pioneer Woman: coffee, vanilla, and maple. Dooooo it.
I brought 20 rolls to the young adult meeting and they were all gobbled up by the time the talk started, so I think that counts as a success!
Jessica's Cinnamon Rolls
1/2 recipe Basic Bread Dough or any white bread dough
1/3 cup salted butter, melted
1/2 cup brown sugar
1 tbsp cinnamon
Preheat oven to 425.
Roll out bread dough into a rectangle, approximately 18" by 12". Spread melted butter on the dough, being careful to get all the way to the edges on each side. Mix together the brown sugar and cinnamon and sprinkle it over the dough, again being careful to get it all the way to the sides. (Otherwise the rolls on the end won't have much flavor!) Roll the dough up, starting in the middle and working out to the ends with each revolution.
Use a serrated knife to cut the dough log into rolls about 1inch tall (I think mine were a little less). Place into a greased pan or muffin tin.
Bake for about 25 minutes (20 minutes or less for rolls in muffin pans) or until light golden brown.
Maple-Coffee Glaze
Adopted from The Pioneer Woman
2 cups powdered sugar1/4 cup milk
1/4 cup strong coffee
2 tbsp maple syrup
Mix together and drizzle over rolls. This works best when the rolls are warm!
Favorite bread dough
The start of finals week also usually means a return to baking for me...at least it's a productive way to avoid schoolwork! This is a simple, versatile dough that I've returned to again and again.
Like I said, it's a simple ingredient list: flour, water, yeast, salt, oil.


1/2 cup almond milk (or 2 1/2 cups liquid)
1 1/2 tbsp yeast (2 packets)
2 1/2 tbsp olive oil
Heat the water and milk together in the microwave for about 45 seconds, until warm but not hot to the touch. Add the yeast and let it sit for about 10 minutes. You should see a little bit of foaming and some bubbles -- if not, your yeast was too old and you should start over.
Mix the salt into the 6 1/2 cups flour, then add the yeast/water mixture and the olive oil. Turn the dough out onto a floured surface and knead for 5-7 minutes. This dough is pretty wet/sticky, so I usually end up adding about another 1/2 cup of flour as I'm kneading it.
Once the dough is smooth and elastic, grease a bowl (usually I use the same mixing bowl) and place the dough in the bowl. Cover with a dish towel and let rise for about an hour or until it doubles in size.
Take the dough out and knead it a few times to punch it down.
Preheat oven to 425. Divide into four sections and shape each section into a loaf. Place on a greased cookie sheet (you should be able to fit two loaves per cookie sheet). Allow to rise for another 30 minutes, then bake for about 25 minutes, until lightly brown.
Like I said, it's a simple ingredient list: flour, water, yeast, salt, oil.
I've used whey instead of water when I've had it, which produced a slightly sweeter bread. For this batch, I used 2 cups of water and 1/2 cup Vanilla Breeze Almond Milk.
This recipe makes a lot of dough! I divided it into three parts, to use in cinnamon rolls, pesto bread, and homemade hot pockets. Recipes coming soon!
It was a beautiful day, so I went for a run while the dough was rising! Taking an acceptable selfie was the hardest part! It was the first day of the year that I ran in shorts, rather than pants or leggings. Let's call this summer, shall we?
Basic Bread Dough
adopted from Confessions of a Foodie Bride
2 cups water1/2 cup almond milk (or 2 1/2 cups liquid)
1 1/2 tbsp yeast (2 packets)
7 cups flour, divided
2 1/2 tsp salt2 1/2 tbsp olive oil
Mix the salt into the 6 1/2 cups flour, then add the yeast/water mixture and the olive oil. Turn the dough out onto a floured surface and knead for 5-7 minutes. This dough is pretty wet/sticky, so I usually end up adding about another 1/2 cup of flour as I'm kneading it.
Once the dough is smooth and elastic, grease a bowl (usually I use the same mixing bowl) and place the dough in the bowl. Cover with a dish towel and let rise for about an hour or until it doubles in size.
Take the dough out and knead it a few times to punch it down.
At this point, you can use the dough for several different recipes. If you just wanted to bake normal loaves of bread, follow the instructions below.
Preheat oven to 425. Divide into four sections and shape each section into a loaf. Place on a greased cookie sheet (you should be able to fit two loaves per cookie sheet). Allow to rise for another 30 minutes, then bake for about 25 minutes, until lightly brown.
Subscribe to:
Comments (Atom)